正文
balabala… 2019 年的第一篇博客,继续 2018 年的最后一篇博客 ThreadPoolExecutor 的讲解,我们今天来说一下在 ThreadPoolExecutor 里面用到的队列, LinkedBlockingQueue,SynchronousQueue 等, 今天这篇博客主要来讲解一下 LinkedBlockingQueue,相比 SynchronousQueue, LinkedBlockingQueue 会简单 很多,下一篇会着重讲一下 SynchronousQueue 的实现原理
LinkedBlockingQueue 在我们常用到的 FixedThreadPool 中使用的就是 LinkedBlockingQueue,在线程池中使用到的地方主要是第一次添加任务以及后面的获取任务
会和队列打交道。
LinkedBlockingQueue 实现了 BlockingQueue 继承了 AbstractQueue,在 LinkedBlockingQueue 中,元素间是以链表的形式穿起来的,会有一个 head 和一个
last 元素来记录头尾,这里就是一个链表,我引用另外一篇博客中的图片加以说明

这里的 head 是一个类似于前置的指针, head.item 是空的,而 last 则是包含真实元素的。
下面是 LinkedBlockingQueue 的继承关系图
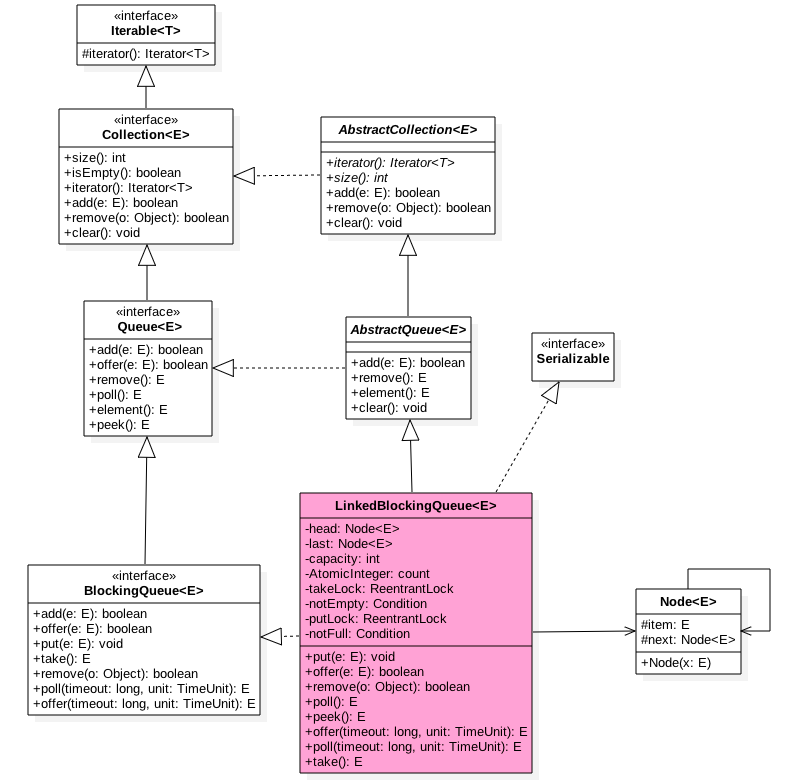
从上面的类图中可以看出,LinkedBlockingQueue 使用了两个可重入锁,takeLock 和 putLock,这里就可以猜出, LinkedBlockingQueue 是一种读写分离的队列,读写分离在并发高的场景下势必还是会有一定优势的,有着更大的吞吐量,
因为这个队列比较简单,所以这次我就不用例子举例了,直接上源码,来先看一下构造器
LinkedBlockingQueue 构造器
    // 队列的容量
    private final int capacity;

    // 当前元素的个数
    private final AtomicInteger count = new AtomicInteger();

    /**
     * 队列的 head 指针
     * Invariant: head.item == null
     */
    transient Node<E> head;

    /**
     * 队列尾部
     * Invariant: last.next == null
     */
    private transient Node<E> last;

    // 读锁
    private final ReentrantLock takeLock = new ReentrantLock();

    // 队列空的 condition
    private final Condition notEmpty = takeLock.newCondition();

    // 写锁
    private final ReentrantLock putLock = new ReentrantLock();

    // 队列满的 condition
    private final Condition notFull = putLock.newCondition();

    public LinkedBlockingQueue() {
    // 默认情况下,容量是 MAX_VALUE
        this(Integer.MAX_VALUE);
    }

    public LinkedBlockingQueue(int capacity) {
        if (capacity <= 0) throw new IllegalArgumentException();
        this.capacity = capacity;
        last = head = new Node<E>(null);
    }

    // 可以将另一个容器里面的元素转移到队列中
    public LinkedBlockingQueue(Collection<? extends E> c) {
        this(Integer.MAX_VALUE);
        final ReentrantLock putLock = this.putLock;
        // 这里不是防止资源竞争,而是保证可见性 (AQS 中的 state 是由 volatile 修饰的)
        putLock.lock(); // Never contended, but necessary for visibility
        try {
            int n = 0;
            for (E e : c) {
            // 可以看到,队列中不允许有 null,有就会直接报空指针
                if (e == null)
                    throw new NullPointerException();
            // 超过容量报异常
                if (n == capacity)
                    throw new IllegalStateException("Queue full");
                    // 插入一个元素
                enqueue(new Node<E>(e));
                ++n;
            }
            count.set(n);
        } finally {
            putLock.unlock();
        }
    }
enqueue 插入元素方法
    private void enqueue(Node<E> node) {
        // assert putLock.isHeldByCurrentThread();
        // assert last.next == null;
        last = last.next = node;
    }
该方法很简单,就是将元素挂到尾部,相对应 enqueue,也会有一个 dequeue 方法来删除元素
dequeue 删除元素方法
   private E dequeue() {
        // assert takeLock.isHeldByCurrentThread();
        // assert head.item == null;
        Node<E> h = head;
        // 第一个元素
        Node<E> first = h.next;
        // 这里通过循环引用来帮助 gc
        h.next = h; // help GC
        // 直接将 head 设置为 first,然后将 first 的 item 设置为 null,成为新的 head,然后返回 item
        head = first;
        E x = first.item;
        first.item = null;
        return x;
    }
ps,队列是尾部元素,头部出元素的形式,先进先出 FIFO 形式的
LinkedBlockingQueue 中包含了获取元素方法:take(阻塞),poll(非阻塞),poll(time)(阻塞 time 时间),peek(非阻塞) LinkedBlockingQueue 中包含了增加元素方法:put(阻塞),offer(非阻塞),offer(time)(阻塞 time 时间) 继承过来的方法就不说啦,实际上都是直接调用的子类实现的方法做了一层判断以及抛异常
其中阻塞和非阻塞最大的区别就是是否等待,非阻塞会直接返回 false,阻塞的则会等待,知道其他方法通过 condition 进行通知,我主要讲解一下阻塞的方法
take 阻塞获取队列元素
    public E take() throws InterruptedException {
        E x;
        int c = -1;
        final AtomicInteger count = this.count;
        final ReentrantLock takeLock = this.takeLock;
        // 调用了 ReentrantLock 中的可中断的锁()这个锁和不可中断的锁区别就是期间受到中断会立即 `throw new InterruptedException`,而普通的锁则会
        // 继续等待锁,知道获取到了之后才响应中断,可中断的会立刻放弃等待
        takeLock.lockInterruptibly();
        try {
            while (count.get() == 0) {
                // 调用 condition 阻塞
                notEmpty.await();
            }
            // 调用 dequeue 方法进行元素值的获取,同时移除头结点
            x = dequeue();
            // 当前队列中的元素个数减一
            c = count.getAndDecrement();
            // c > 1 说明队列中还有值,获取完后进行通知,结束代码块后其他线程可以在阻塞的地方继续
            if (c > 1)
                notEmpty.signal();
        } finally {
        // 释放读锁
            takeLock.unlock();
        }
        if (c == capacity)
        // 这里回去通知 put/take 线程继续放元素,因为 c == capacity 说明现在不是满的
            signalNotFull();
        return x;
    }
put 阻塞放置队列元素
    public void put(E e) throws InterruptedException {
        // 不允许元素为 null
        if (e == null) throw new NullPointerException();
        int c = -1;
        // 构建一个 node
        Node<E> node = new Node<E>(e);
        final ReentrantLock putLock = this.putLock;
        final AtomicInteger count = this.count;
        // 上允许中断的锁
        putLock.lockInterruptibly();
        try {
            while (count.get() == capacity) {
                // 如果容量满了就阻塞等待
                notFull.await();
            }
            // 放置元素
            enqueue(node);
            c = count.getAndIncrement();
            // 如果 c + 1 小于 capacity 说明还可以继续放
            if (c + 1 < capacity)
                notFull.signal();
        } finally {
            putLock.unlock();
        }
        // 如果原来的 c == 0, 说明有限成在等待获取,通知等待的线程
        if (c == 0)
            signalNotEmpty();
    }
peek 获取队列头元素
    public E peek() {
        // 容量 == 0 直接返回 null
        if (count.get() == 0)
            return null;
        final ReentrantLock takeLock = this.takeLock;
        // 上锁
        takeLock.lock();
        try {
            Node<E> first = head.next;
            if (first == null)
                return null;
            else
                return first.item;
        } finally {
            takeLock.unlock();
        }
    }
unlink 删除指定节点
    void unlink(Node<E> p, Node<E> trail) {
        // 将 p 的 item 设置为 null
        // trail -> p -> p.next
        p.item = null;
        // 将 trail 的 next 设置为 p 的 next
        trail.next = p.next;
        // 如果 p == last,直接将 trail 设置为 last
        if (last == p)
            last = trail;
            // 如果删除前的容量 == capacity,通知 put/take 放置元素
        if (count.getAndDecrement() == capacity)
            notFull.signal();
    }
remove 删除指定节点
    public boolean remove(Object o) {
        if (o == null) return false;
        // fullyLock 会同时上读写锁
        fullyLock();
        try {
            for (Node<E> trail = head, p = trail.next;
                 p != null;
                 trail = p, p = p.next) {
                 // 找到相应的节点然后调用 unlink 方法删除
                if (o.equals(p.item)) {
                    unlink(p, trail);
                    return true;
                }
            }
            return false;
        } finally {
            fullyUnlock();
        }
    }
toArray 方法 (有个小坑)
    public <T> T[] toArray(T[] a) {
    // 全局锁
        fullyLock();
        try {
            int size = count.get();
            // 如果传入的数组大小小于队列的长度,就会新建一个数组,注意这个时候你穿金来的对象已经不使用了,外部一定要接收返回值,不能使用传入的对象
            if (a.length < size)
                a = (T[])java.lang.reflect.Array.newInstance
                    (a.getClass().getComponentType(), size);

            int k = 0;
            for (Node<E> p = head.next; p != null; p = p.next)
                a[k++] = (T)p.item;
            if (a.length > k)
                a[k] = null;
            return a;
        } finally {
            fullyUnlock();
        }
    }
toArray 方法中,数组的引用一定要注意,因为可能因为容量原因而是用新的数组,在调用方法的时候一定要使用返回值重新赋值
本片博客内容就暂时这么多,下一片博客会对 SynchronousQueue 进行一个源码分析~
本文首次发布于 fyypumpkin Blog, 作者 @fyypumpkin ,转载请保留原文链接.